
Equalising your ears
Practical tips and advise
Ear problems as a result or improper/inadequate equalisation of the air space are an unfortunate and seemingly unavoidable issue for many divers.
In an effort to reduce this negative side-effect of diving, let’s explore what happens to the ears during descent, and what can be done to keep them happy.
The ear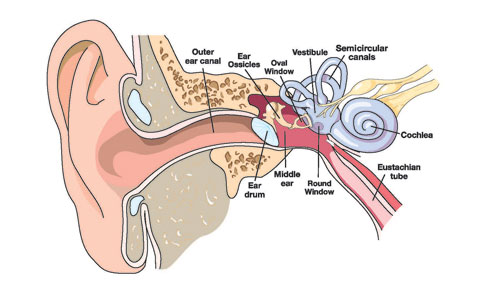
The inner ear is essentially an enclosed air space. It is connected to the back of your throat via the Eustachian tube. The Eustachian tubes are normally closed by a small valve – the Eustchian cushion – which prevents contamination from your nose and throat migrating into your inner ears.
The lining of the inner ear is living tissue which absorbs Oxygen. This means that the air pressure in your inner ear regularly drops below the ambient pressure.
We can only open the Eustachian cushion through a conscious act, such as swallowing. Roughly every other time you swallow, you may notice a soft clicking or popping noise coming from somewhere within your head. This is the sound of the Eustachian cushion opening to allow fresh air into the inner ear.
The problem when we go diving is that the pressure on the outer and middle ear increases far more, and far more rapidly, than we ever experience on land. We need to be proactive to avoid the most common of diving ear-complaints – the middle-ear barotrauma (pressure injury).
During descent
According to DAN (Divers Alert Network), here is a step-by-step description of what happens in your ears if you fail to equalise:
At 1 foot depth (approx. 30 cm) the pressure is already pushing on the ear-drum is already sufficient to cause a sensation of pressure.
At 4 feet (approx. 1.3 metres) your ear drum is bulging in towards the middle ear. So too are the round and oval windows between your middle and inner ears. Nerve endings are stretched and you will begin to feel pain.
At 6 feet (approx. 2 metres) the tissues and blood vessels in your eardrum begin to tear, causing inflammation which may last up to a week. Blood vessels will be stressed and may break causing bruising which may last up to three weeks. Your Eustachian tube (which is soft and flexible) is now sealed completely shut by the negative pressure – equalisation becomes impossible.
By the time your reach 8 feet (less than 3 metres) blood, mucous and other fluids have been drawn from the surrounding tissues to attempt to fill the middle ear and equalise the pressure (by reducing the available size of the air space). This is a middle ear barotrauma. The pain will probably reduce as the ear-drum can relax into a more normal position. However, the fluid will remain inside the ear for several days – perhaps a week or more – before being drained or re-absorbed by the body. During this time you will have to deal with an uncomfortable sensation of ‘fullness’ inside the ear.
If you are unlucky – for example if your descent through the first 3 metres/10 feet is quite rapid – then you may not allow time for the middle ear baro-trauma to compensate for the loss of pressure inside the ear. In this case you may rupture the ear-drum. When this happens, water floods into the middle ear. The sudden sensation of cold against your balance mechanism will usually cause extreme vertigo, especially if only one ear drum breaks. Gradually this sensation will subside as your body warms up the water.
Another common result from improper equalising occurs when it is left too late, and attempted too forcefully. This maneuver can cause the round window membrane, between the middle and inner ear, to rupture. This is called an inner-ear barotrauma, and the result is that Perilymph fluid drains into the middle ear from the cochlea. Temporary, or sometimes permanent, hearing loss can result.
Sounds nasty – what can we do?
There are several techniques we can try in an effort to equalise our ears adequately. Essentially, all of these are simply a way to open the Eustachian cushion and allow the air pressure of the inner-ear to equalise with the air pressure in your throat and nasal cavity.
Valsalva Maneuver
This is the most common method – pinch the nose closed and blow gently against your closed nose – this increases the pressure in the throat, which usually forces some of the pressure up into the Eustachian tube.
It is very important to avoid delaying or prolonging this maneuver, and to only blow gently against your closed nose so as not to increase the pressure inside your ear beyond what is required. This maneuver does not activate any muscles which may open the Eustachian tube, and so it will not be effective is negative pressure has already sealed the tube closed. If this maneuver does not work immediately and comfortably, then something is wrong.
There are other methods:
Voluntary Tubal Opening
This is a technique which usually requires lots of practice, and not all divers will be able to master (although some lucky people can do this very easily with little or no practice). The method is to tense the muscles in your soft-pallet and throat whilst pushing the lower jaw forward and down, as if starting to yawn.
With practice, some divers find they can use this technique to hold the tubes open for continuous equalisation.
Toynbee Maneuver
Pinch your nose and swallow. Swallowing allows the tubes to open, while the movement of your tongue pushes air against the tubes. With the air unable to escape from your nose, it will (hopefully) enter the Eustachian tubes.
Frenzel Maneuver
Close your nostrils and tense the back of your throat as if preparing to lift something heavy. Then make the sound of the letter ‘K’. This forces the back of your tongue upwards, compressing air against the
opening of the Eustachian tubes.
Lowry Technique
This is simply a combination of the Valsalve and Toynbee methods – Pinch the nose closed, swallow and blow at the same time.
Edmonds Technique
This is a mix between the Valsalve manueuver and the Voluntary tubal opening technique – pinch your nose closed, tense the muscles in the soft-pallet and throat, push the jaw down and forward as if beginning to yawn, and blow against your pinched nostrils.
Most of these techniques will require practice. If you regularly experience problems equalising then it may be beneficial to practice and become proficient in more than one technique. It can also be helpful to practice in front of a mirror as this allows you to see the muscles in your throat activating.
When should I equalise?
Most authorities recommend equalising the
pressure in your ears at least once for every 2 feet (60 cm) of descent. As long as the maneuver is done gently, there is little chance of equalising too often!
If you are descending at a rate of around 20 metres a minute, then you’ll descend 2 feet approximately every 2 seconds. Divers who know that they often experience difficulty equalising their ears should aim to make descents very slowly, and ensure that their buddy/dive group are aware of this need.
What else can I do?
1 – Listen for the ‘pop’
Before the diving day begins, listen out for the ‘pop’ or ‘click’ in both ears when swallowing – this tells you that the Eustachian tubes are opening as they should.
2 – Start early
Some diving doctors recommend gently ‘equalising’ your ears several hours before the dive, and doing so periodically before you enter the water. Chewing gum often seems to help as well, since the constant movement of the jaw will cause the Eustachian tubes to open and close frequently.
3 – Pre-pressurise
Some people suggest pre-pressurising the ears (using the valsalve maneuver) while still at the surface. This will help provide a small cushion to get you through the first few feet of the descent while you are occupied with other things such as manipulating the BCD and finding a comfortable position.
Important note about tips #2 & 3: When presurising the ears whilst still on the surface, it is very important to do so very gently, and only if you find it helps you – it won’t work for everyone and these techniques will still put some stress on the ears.
4- Descend feet-first
Air wants to rise upwards in water – studies have shown that the Valsalve maneuver requires 50% more force when in a head-down position.
5 – Look up
Looking up and tilting the head from side to side stretch the neck and allow the Eustachian tubes to open.
6 – Don’t be ashamed to use a little help
Wherever possible, use a tactile reference (eg: mooring line) while descending. This allows you much greater control of your depth and rate of descent.
7 – Be proactive
Equalise frequently and gently throughout the descent, perhaps aiming to keep a small amount of positive pressure in the middle ear.
8 – Don’t tolerate pain!
If it hurts, something is wrong. Don’t push through the pain! If you fail to equalise and experience discomfort or pain in your ears, almost certainly your Eustachian tubes are locked shut. Descending further will only cause Barotrauma or worse. Try ascending, not only until your ears feel okay again, but further until you are shallower than the depth you last successfully equalised. You’ll know you have gone far enough when you feel air expand and escape out of the affected ear. Now you know that the Eustachian tube is open and functioning again, and you can attempt your descent again.
9 – Avoid alcohol and tobacco
Smoke and alcohol irritate the mucus membranes, causing increased mucous production which can interfere with the function of the Eustachian tubes.
10 – Keep your mask clear
Water in the mask and nose will also increase mucous production, which will potentially cause blockages to these airways. Learn more about how to select the right most here.


